Wednesday, June 27, 2018
How to Publish an Ebook Picture Book from a Mac for Nook Kindle PDF
How to Publish an Ebook Picture Book from a Mac for Nook Kindle PDF
I promised Id post the process I used to create my ebook, "Princesses, Princesses, Princesses!" for PDF download, for Kindle, for Nook. Its actually not that hard but certain steps can be tricky. Hopefully this little tutorial will help you avoid some of my mistakes. I need to thank VonLogan Brimhall for their tutorial. It got me started. It may work well for PC users, but I am an Apple girl. So there were just some parts that didnt translate well. In addition, the dimensions they proposed for the devices didnt work for me when importing to InDesign and to the devices from there. And finally, there were a few easier tricks I learned in the process.
Remember, Kindle and Nook both have free apps for iphone and ipad and in the android market so anything sold by them can be read on those devices as well. You arent limited to just kindle or nook users.
Heres what programs I used...so if you dont have these 2 programs, this tutorial wont be super useful to you. Im sorry.
- Adobe Photoshop (any version should do- I have CS5)
- Adobe InDesign (version CS5 is what I used, I dont know if earlier versions work, I think CS4 does)
- Adobe Acrobat (I used Pro, youll need more than just the reader)
Or download a PDF of this entire post, HERE.
Creating a Nook picture book
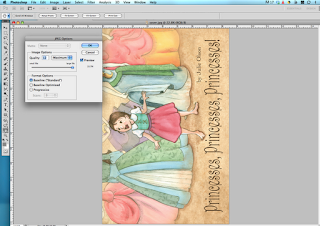
Step 1: Open each image in Adobe Photoshop. Resize all of your images to fit within a space 2550 pixels wide by 3242 pixels high, set at 300 dpi. (ignore the screen shot numbers below, just fill in what I specified)

And save as jpg images (do not check the progressive scan option, baseline standard jpg is what you choose).
I had to rotate my images 90 degrees counter clockwise because I wanted it to look like a real horizontal picture book spread and not a single vertical page. Then the viewer using the Nook just turns the device horizontal to read instead of vertical.
Save all the images in one folder. I named my folder NookKindle because youll use the same images for each device. And make sure the files are named so they are in the correct order. For example, I named mine cover, page01, page02, page03 etc.
Make sure there are no glitches or spelling or formatting errors in your images before moving on.
Step 2: Open Adobe InDesign CS5 (or you can try it in an earlier version...post in the comments if these steps still work for you).
- Press COMMAND N (cmnd N) for a new document. And Click OK.
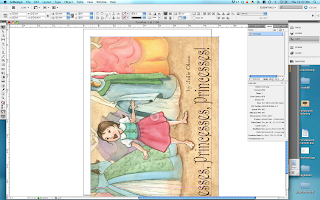
- Press cmnd D to place an image on the page.
- Choose your file (start with cover.jpg or whatever you named your cover). Click Open
- A thumbnail image will show up with a little brush. Drag it to the upper left corner and line up with the reddish purple margin and CLICK the mouse button. Itll end up looking like this...going off the page. LEAVE IT as it is. Do not worry. Itll all work out.
- Save it by pressing cmnd S. Put the files all into a separate folder so they are easy to access later.
- Do each of the above steps again and again until youve saved each of your images as a separate .indd document.
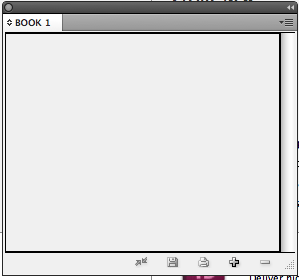
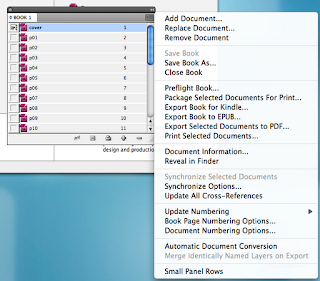
- Go to File/New/Book or choose Book from the main InDesign Menu Panel and name your book file and click Save
- In the pop-up window, press the + symbol on the lower right to add your content to the book.
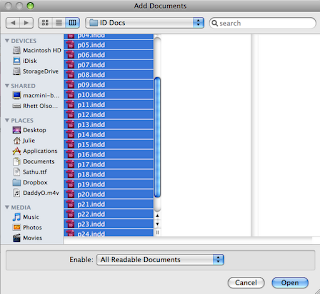
- You can select all the files at once by clicking and holding down the shift key, just make sure they are in the order you want them. Then click Open.
- Save the Book file you just created by clicking the disk icon in the open panel which includes your book files.
- Heres where my instructions again vary from VonLogans. Thankfully, its simpler. Click on the small dropdown menu icon in the upper right corner of the book files panel. Click Export Book to EPUB... and save it under yourbooktitle.epub
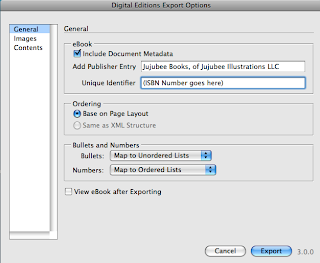
- In the "Digital Editions Export Options" panel, under General, you can include data such as your name or company name under publisher and an isbn number if the book has it (those can be purchased but are not necessary)
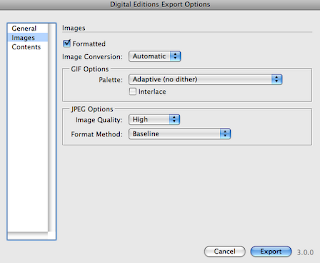
- Then click Images on the left and change the jpg size option to High instead of Medium.
- Click Export
Your book is now ready to upload and sell on the Nook. Go to http://pubit.barnesandnoble.com , create an account, and upload your book. It takes longer to get through the review process for Nook than for Kindle...a full 72 hours. But thats not too bad. Have your bank account numbers and tax id numbers ready when you create your account.
Creating a Kindle picture book
Now that youve created your book for Nook, creating the Kindle book will be easy. You already have all your files ready and in InDesign. If you didnt follow those steps, follow steps 1-3 under Creating a Nook Book. Then, follow the next few steps and itll be up on Kindle in less time than on the Nook.
Step 1: Download the Kindle plugin for InDesign here
You must be running Mac OSX 10.5 or later and InDesign version CS4 or later
Step 2: Open your Book.innd file or if you didnt save it, follow step 3 under the nook instructions above.
Step 3: Export to MOBI for Kindle
- Click Export Book for Kindle... and save it under yourbooktitle.mobi . Click Save.
- Click Images on the left and change the jpg size option to High instead of Medium.
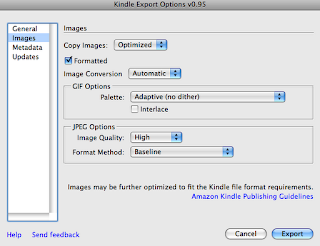
- Click Metadata on the left and fill in the information.
- Click Export

You now have your Kindle compatible file to upload.
Go to kdp.amazon.com (kindle direct publishing) and create a publisher account. Again youll need all account and tax info handy. Word of caution, they will try to get you to sign up for KDP select. I chose not to because of the exclusivity for 90 days. Just an FYI.
There are many options to review (more than for Nook) concerning royalties, digital rights management etc. I cannot tell you what to do here, except that you should read each thoroughly and then make your choice.
FINALLY the easiest one to create...
Creating a PDF downloadable Picture Book
Step 1: Resize all of your images to fit within 865 pixels wide by 562 pixels high at 72 dpi. These will need to remain horizontal as youd want to view them in a normal pdf reader. In this version of your ebook, what you see is exactly what you get. Then Save each image as a jpg in a folder labeled PDF with names that will keep them in the proper order.
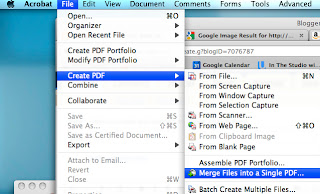
Step 2: Open Adobe Acrobat Pro
- Click File/Create PDF/Merge Files into a Single PDF...
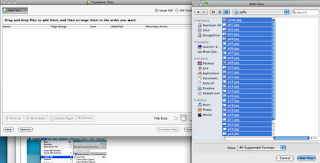
- Click Add Files and Add Files again, Select the files and click Add Files.
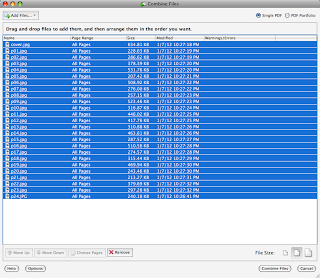
- Make sure they are in the right order and click Combine Files.
- And when the next window pops up, just save the file as YourBookTitle.pdf
- Scroll through the document and make sure it looks how you want it to look (it should if youve prepped it right and then followed the steps).
- If there are no changes, YOU ARE DONE! Your PDF is ready to upload for sale.
PDF books open in any pdf reader, on computers, on smartphones, tablets, etc. Its nice to make sales this way because no one takes a cut of the profit. You can sell them off your blog, webpage, etc. and use paypal as the money changer. However, I just chose to upload mine to another illustrators store that she has set up and link to it off my blog. I highly recommend it. Go there and click "create an account" at the upper right. Nice and simple.
Heres the link...
THE ILLUSTRATED SECTION
If you appreciate this tutorial, I would greatly appreciate positive reviews of my ebook on Nook, Kindle stores and even a download or two of the book. ;-)
Subscribe to:
Post Comments (Atom)
No comments:
Post a Comment
Note: Only a member of this blog may post a comment.