Thursday, February 12, 2015
Date Input Controls Componets in pentaho CDE with a working example
Hello guys...!!!
In this post you will learn about how to create input controls in CDE.
The dashboard images which I am going to show below are having lots of .css code. Im not covering all the things but concentrating on only Date input controls in CDE.
My Environment :
BI Server: Pentaho 4.5
CTools:Not found the version numbers of C-Tools(Unable to check them)-- perhaps..! lesser than 13
Database : hsqldb (Comes along with pentaho installation -- A java based small db for servers like pentaho)
NOTE: Images are taken in this post after worked out the example. So find the yellow rectangular boxes to understand.
You need to work out @ 3 places in "Components" section.
1. Generic
2.Selects
3.Charts
Explained from step 1 to step 3
You need to work out @ 1 places in "Data Sources" section. i.e, all in "Properties"
Im not concentrating on Layout part for this example. So wherever the HtmlObject you find in this example replace them with your working HtmlObjects.
Step 1: Creating parameters
* Design your dashboard as per your requirement ( In the images you can find the sample designs).
In the "Components" section:
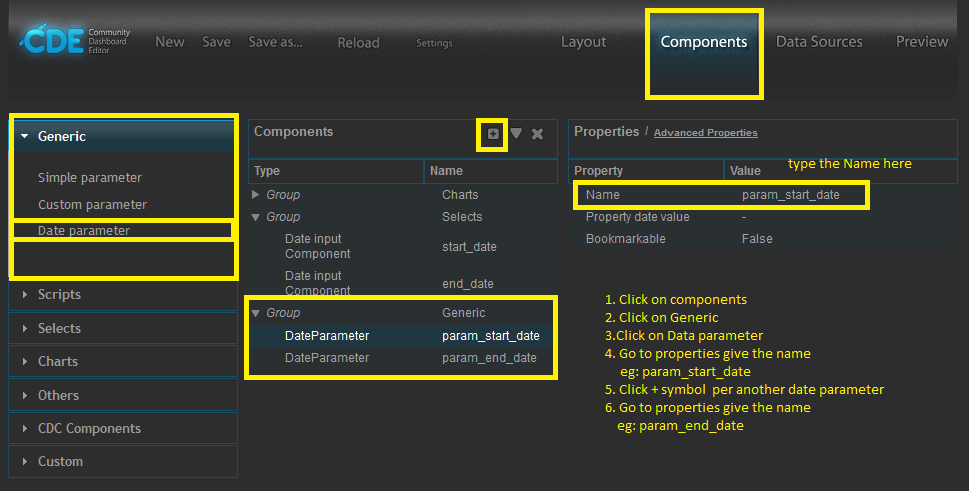
1. Click on components
2. Click on Generic
3.Click on Date parameter
4. Go to properties give the name
eg: param_start_date
5. Click + symbol per another date parameter
6. Go to properties give the name
eg: param_end_date
Find the image
Step 2: Creating Date input Components
In the "Components" section
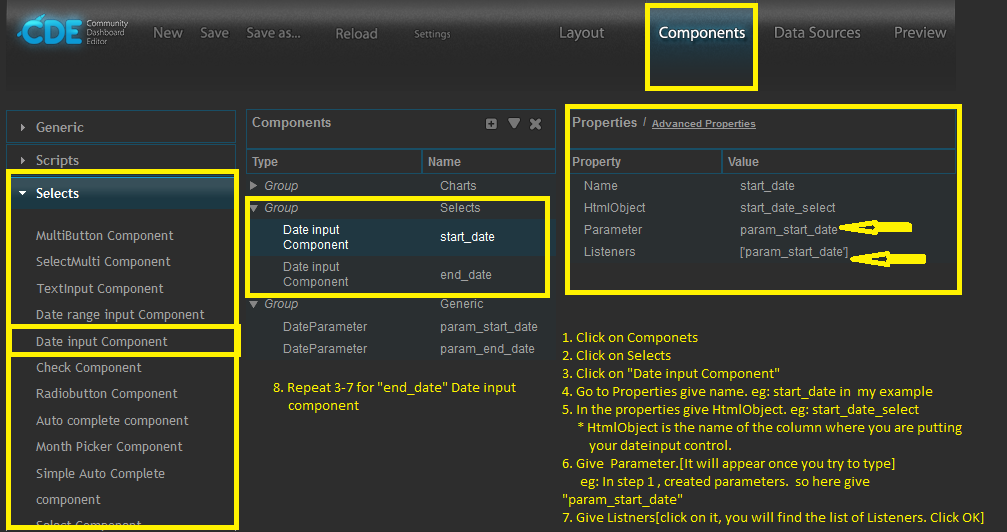
1. Click on Componets
2. Click on Selects
3. Click on "Date input Component"
4. Go to Properties give name. eg: start_date in my example
5. In the properties give HtmlObject. eg: start_date_select
* HtmlObject is the name of the column where you are putting
your dateinput control.
6. Give Parameter.[It will appear once you try to type]
eg: In step 1 , created parameters. so here give "param_start_date"
7. Give Listners[click on it, you will find the list of Listeners. Click OK]
8. Repeat 3-7 for "end_date" Date input
component
Step 3:
Find the steps in image.
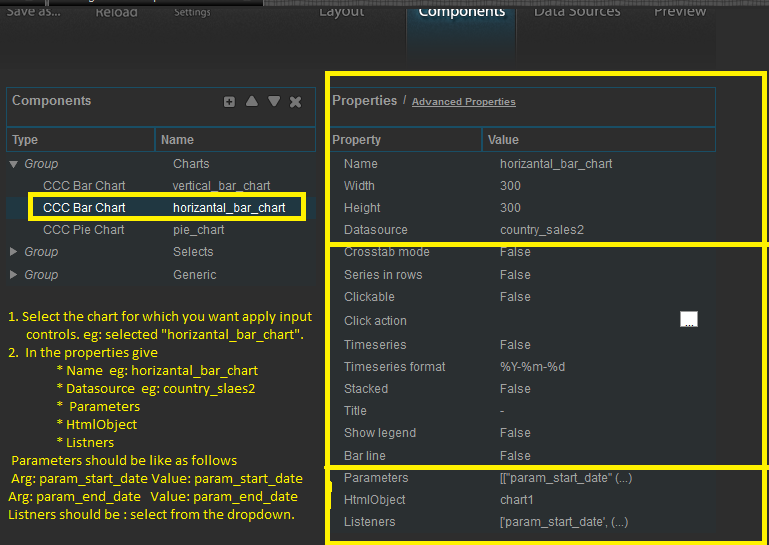
Html Object is the place where you are putting your chart.
Step 4: Applying parameters for Chart & Query
In the "DataSoruces"
Find the steps in the image
Find the sub sequent image for Parameters applying for chart & Query.
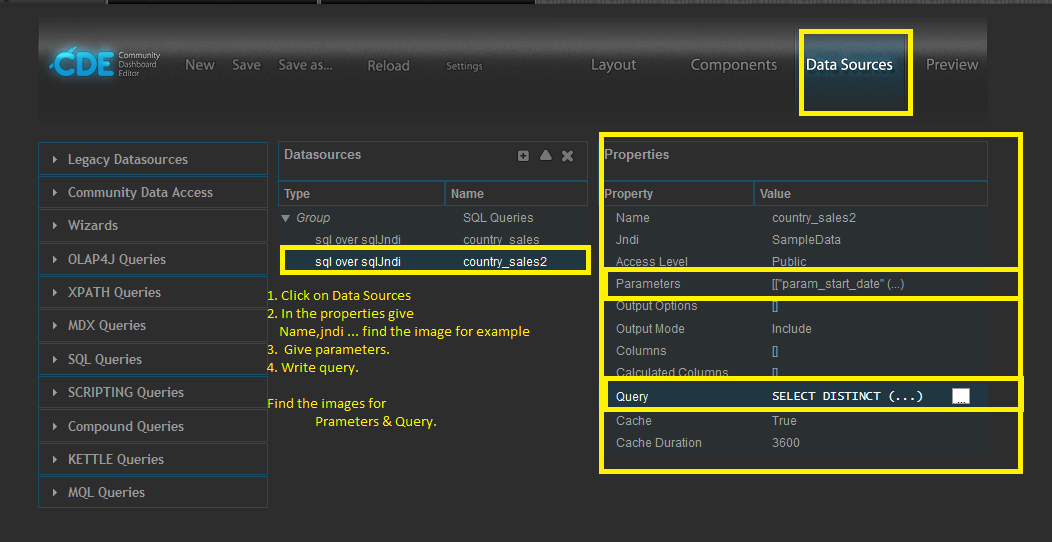

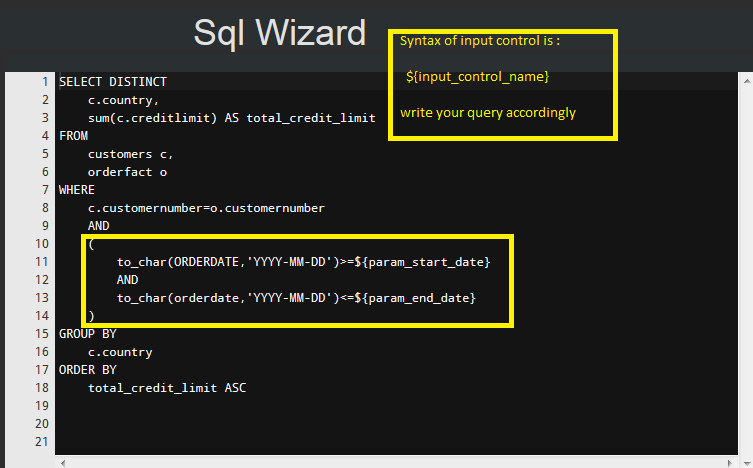
do same as shown in images.
Step 5:
Save the dashboard and then Click on "Preview" button.
See the images below for sample out put with date input controls.
Preview of the dashboard with out any input controls selection

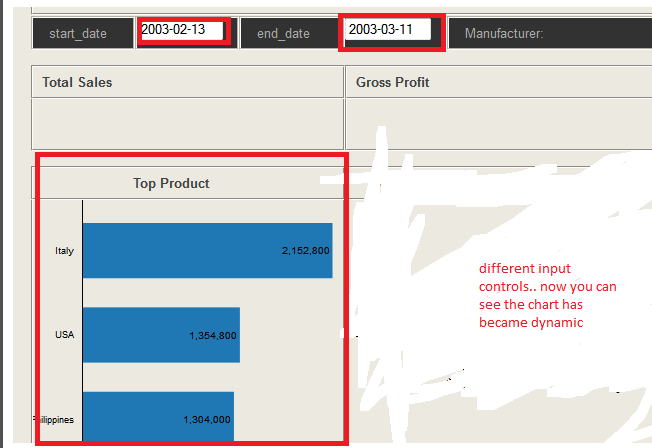
Preview of the dashboard after selecting date input controls.. find the images below one by one.
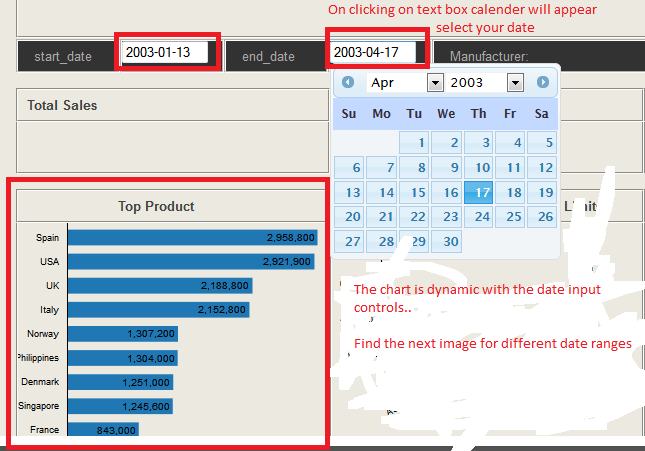
Find the image for observing whether the chart become dynamic or not with different date input controls.
Thats it.. You are done with date input controls on dashboard.
Thank you for reading this small post.
Sadakar.P
sadakar.1988@gmail.com
In this post you will learn about how to create input controls in CDE.
The dashboard images which I am going to show below are having lots of .css code. Im not covering all the things but concentrating on only Date input controls in CDE.
My Environment :
BI Server: Pentaho 4.5
CTools:Not found the version numbers of C-Tools(Unable to check them)-- perhaps..! lesser than 13
Database : hsqldb (Comes along with pentaho installation -- A java based small db for servers like pentaho)
NOTE: Images are taken in this post after worked out the example. So find the yellow rectangular boxes to understand.
You need to work out @ 3 places in "Components" section.
1. Generic
2.Selects
3.Charts
Explained from step 1 to step 3
You need to work out @ 1 places in "Data Sources" section. i.e, all in "Properties"
Im not concentrating on Layout part for this example. So wherever the HtmlObject you find in this example replace them with your working HtmlObjects.
Step 1: Creating parameters
* Design your dashboard as per your requirement ( In the images you can find the sample designs).
In the "Components" section:
1. Click on components
2. Click on Generic
3.Click on Date parameter
4. Go to properties give the name
eg: param_start_date
5. Click + symbol per another date parameter
6. Go to properties give the name
eg: param_end_date
Find the image
Step 2: Creating Date input Components
In the "Components" section
1. Click on Componets
2. Click on Selects
3. Click on "Date input Component"
4. Go to Properties give name. eg: start_date in my example
5. In the properties give HtmlObject. eg: start_date_select
* HtmlObject is the name of the column where you are putting
your dateinput control.
6. Give Parameter.[It will appear once you try to type]
eg: In step 1 , created parameters. so here give "param_start_date"
7. Give Listners[click on it, you will find the list of Listeners. Click OK]
8. Repeat 3-7 for "end_date" Date input
component
Step 3:
Find the steps in image.
Html Object is the place where you are putting your chart.
Step 4: Applying parameters for Chart & Query
In the "DataSoruces"
Find the steps in the image
Find the sub sequent image for Parameters applying for chart & Query.
do same as shown in images.
Step 5:
Save the dashboard and then Click on "Preview" button.
See the images below for sample out put with date input controls.
Preview of the dashboard with out any input controls selection
Preview of the dashboard after selecting date input controls.. find the images below one by one.
Find the image for observing whether the chart become dynamic or not with different date input controls.
Thats it.. You are done with date input controls on dashboard.
Thank you for reading this small post.
Sadakar.P
sadakar.1988@gmail.com
Subscribe to:
Post Comments (Atom)
No comments:
Post a Comment
Note: Only a member of this blog may post a comment.